Monday, November 25, 2013

Herb Crusted Chicken with Parmesan Cream Sauce

I admit it, I love eating at Olive Garden. I know it isn't authentic Italian food, but I really don't care.  How can anyone not like free never ending breadsticks and salad with their meal?  I generally order dishes with a cream sauce as opposed to a tomato based sauce.  I can make tomato sauces all day at home but cream based ones always seem to be beyond me.  That is, until I found this recipe.  As far as I am concerned, this beats eating at any Italian restaurant.  I take that back.  There was a mom and pop Italian joint in town until recently that made the best lobster stuffed ravioli I have ever had the pleasure of eating.  I highly doubt I will ever be able to recreate that amazing dish.  This herbed chicken, though, is an excellent way to cure cravings for Italian food and keeps my bank account happy.  I have pictured the chicken and sauce over pasta, but it works equally well on top of mashed potatoes or on its own.  The sauce can also be made by itself for a wonderful twist on macaroni and cheese.  Add less broth for a thicker sauce.

Ingredients

4 chicken thighs/breasts pounded thin
1/2 c milk
1 c Italian breadcrumbs
2 tsp 'Perfect Pinch' Roasted Garlic and Bell Pepper Seasoning
1 tsp dried chives
3 Tbsp butter
3 cloves garlic, minced
1 c chicken broth
1/2 c diced tomatoes, drained and finely chopped
1 pint heavy whipping cream
1 c Parmesan cheese
2 Tbsp basil
Pepper to taste

Directions

1. Preheat oven to 350.
2. Combine breadcrumbs, Perfect Pinch seasoning, and chives in a bowl.
3. Dip chicken in milk, then coat with breadcrumb mixture.
4. Melt butter over medium heat.  Cook chicken until brown on both sides. Set used pan aside.
5. Place chicken in a baking dish and bake until thoroughly cooked, about 15-20 minutes.
6. While chicken bakes, saute garlic over medium high heat in used chicken pan.
7. Add broth and bring to a boil. Scrape bottom of pan while stirring to release any chicken bits.
8. Add cream and tomatoes and return to a boil.
9. Reduce heat to medium low, add Parmesan, basil, and pepper.  Stir until thick and hot (around 5 minutes).
10. Serve sauce over chicken.


Wednesday, November 13, 2013

Bacon and Green Chile Quiche

I've made lots of quiches in my time at the deli I worked at for over a decade. Those were some very tasty quiches, but they weren't technically made from scratch. We used frozen pie crusts (much easier if you are making 12+ quiches a day) and premade quiche mix from the dairy isle.  I was never willing to purchase quiche mix and wasn't sure what all went in to the egg mixture so I never made them at home.
Then, I saw this recipe for a bacon jalapeno popper quiche.  I like (love) bacon, like (love) jalapeno poppers and like quiche.  How could this possibly not be good?  I read the recipe and decided that I wanted a uniform egg mix and not layers as written.  I also added more eggs and green chiles because green chiles make anything better.  (Interesting fact- chili is the amazing meat and pepper stew that my home state is famous for and chile is the pepper that goes in the stew. I= stew, e= pepper.  I always confuse the spellings of the two.)

Consider this to be a basic quiche recipe.  Try it with ham, roasted peppers, and swiss, or chicken, broccoli, and goat cheese. I would have added goat cheese to this quiche but I'm the only person in my house who will eat it. Do with it as you please and get creative.


Ingredients

1 pie crust (thaw if frozen)
8 eggs
1/2 c heavy cream
2 oz cream cheese, softened
6 slices bacon, cooked crisp and crumbled
1 small can diced green chiles
1 jalapeno, diced
1 c cheddar
salt to taste


Directions

1. Preheat oven to 350.

2. Place the pie crust in a pie dish if it isn't already in one. Poke the bottom and sides with a fork.

3. Mix together the eggs, heavy cream, cream cheese, and salt.  Blend until smooth and no more chunks of cream cheese are present.

4. Stir in bacon and green chiles.  Pour mixture into pie crust.

5 Set pie pan on a lined cookie sheet and bake for 30 minutes. Top the quiche with the cheese and jalapeno, then bake another 15-20 minutes until the cheese is melted and browned.


Friday, November 8, 2013

Malt-O-Meal Bread

It has been almost 1 month since I last posted and I apologize greatly for that.

Have you ever paid attention to the recipes that come on the side of food packages?  This recipe is technically called Magic Muffins and can be found on a carton of Malt-O-Meal. While it is intended to be a breakfast muffin, my family has made it as a cornbread alternative for years.  Don't get me wrong, we love cornbread.  Sometimes, though, we have run out of cornmeal or have forgotten where we set down the cornbread recipe last.  This then gets made.  It is still sweet and has the same texture and consistency of cornbread.  There is obviously no corn flavor, but don't let that deter you.  This bread can be used anywhere you would normally make cornbread and is a great alternative for someone with a corn allergy.


Ingredients

1 1/4 c flour
3/4 Malt-O-Meal cereal, dry
1/2 c sugar
3/4 c milk
1/4 c oil
1 egg
1 Tbsp baking powder
1/2 tsp salt


Directions

1. Preheat oven to 400.
2. In a large bowl, mix together all the ingredients until just incorporated.
3. Pour into a greased pan and bake for 18-20 minutes or until center is firm to the touch.

Sunday, October 13, 2013

Spicy Thai Chicken Peanut Curry

There is a Thai restaurant in town that has the most amazing food I have ever eaten.  Their menu is probably 5 pages of different curries and another 2 pages of other traditional Thai dishes.  We don't eat there very often since a plate can easily run $20, but it is a great treat when we do stop in.  Since we don't want to break the bank every time we get a craving for curry, I did some searching and found this recipe for a great, easy curry.

As the title says, this recipe is spicy. Incredibly spicy.  It is the sambal oelek that gives most of the heat to this dish.  I suggest starting with half of the sambal oelek and curry and adjusting as you need to. Add more curry first (it is more flavor than heat), then add the sambal oelek.  The red curry, sambal oelek, and fish sauce can be found in the Asian section of most grocery stores or at your favorite Oriental restaurant.  I know the fish sauce looks scary and disgusting, but I think you will be pleasantly surprised by the flavors it adds. Do not try it by itself though! You will be thoroughly disgusted if you do!

What is your favorite type of curry? 

Ingredients

2 Tbsp oil
3 Tbsp red curry paste
3 tsp sambal oelek (chili paste)
4 chicken breasts, diced
2 c coconut milk
3 Tbsp fish sauce
3 Tbsp brown sugar
3 Tbsp creamy peanut butter
Cooked rice, preferably Jasmine
Peanuts
Lime juice


Directions

1. In a large pan, saute oil, curry, and sambal oelek over medium heat for a couple of minutes.

2. Add in the chicken and cook until done.

3. Stir in the coconut milk, fish sauce, peanut butter, and brown sugar. Simmer 10 minutes.

5. Serve over cooked rice. Top with peanuts and lime juice as desired.


 Please use this photo as reference when searching for your ingredients.  You don't have to use these brands, but so you have an idea what you are looking for.

Friday, October 11, 2013

Cheddar Baked Chicken

Cheese, crispy, buttery chicken! No, this isn't a diet recipe (obviously). Yes, you won't care once you take your first bite. Mash up some potatoes and fry some squash and you have one amazing meal on your hands.  Don't be shocked when you read the ingredients and see rice krispies on the list. They add the perfect crunch.


This recipe comes from happylifehappywife.wordpress.com.


Ingredients

 1/2 c butter, melted
1/2 c flour
1 tsp salt
1 tsp pepper
1 tsp garlic powder
1 egg
1 Tbsp milk
1 c shredded cheddar
1 pouch Shake 'n Bake Extra Crispy
1 c Rice Krispies
3-4 boneless, skinless chicken thighs

Directions

1. Preheat oven to 350. Pour melted butter into baking dish.

2. Mix flour, salt, pepper, and garlic.

3. In a separate bowl, scramble the egg and milk together.

4. In a third bowl, mix the cheese, Shake 'n Bake, and cereal.

5. Dip the chicken first into the flour, then the egg, then the cereal mix, making sure to thoroughly coat each time.  Place in the baking dish.

6. Bake for 35 minutes or until breading is golden brown and chicken is fully cooked.


Thursday, October 10, 2013

Crusty No-Knead Bread

Isn't that picture beautiful?! Perfectly browned fresh baked bread.  The cracks in the crust show how light and fluffy the insides are, the aroma eludes to the heavenly flavor. Sure this bread takes over half a day to make. Who cares? It is totally worth the wait! And one of the best parts of this bread? You can customize it to anything! Make an orange cranberry loaf for Christmas gifts. Or how about a lemon thyme loaf for summer? Throw in a variety of seeds like pumpkin and sunflower for crunch and extra nutrients. The possibilities only end where you imagination stops.

I found this recipe on Pinterest many months ago. The original recipe actually came from an old cast iron cookbook. The original source recommends you use a lidded cast iron dutch oven. You can use any lidded dutch oven/large casserole that you choose, as long as it can withstand 450 degrees. Mine is terra cotta. Your pan does not have to be oiled or floured before you bake. And don't worry about this coming out wrong, the dough is forgiving.

Ingredients

3 c white flour (wheat is too heavy)
1 3/4 tsp salt
1 1/2 c water
1/2 tsp instand or rapid-rise yeast

Directions

1. Combine flour, salt, and yeast in a large bowl. Stir in water and mix until incorporated. (This mix will be sticky.)

2. Cover with plastic wrap and let sit unrefrigerated for 12-18 hours.

3. Preheat oven to 450. Once oven has achieved temp, preheat the dutch oven for 30 minutes.

4. While the oven is preheating, turn the dough out onto a floured surface and roll into a ball. Cover with plastic wrap and set aside for 30 minutes.

5. Remove the dutch oven CAREFULLY and place the dough inside. Bake for 30 minutes.

6. Remove the lid and bake another 15 minutes.

7. Remove from the oven and place on a cooling rack to cool.

 
What are your favorite add-ins? Leave your answer in the comments below.
 

Monday, October 7, 2013

Ranch Pasta Salad

Most people that I know adore the boxed bacon ranch pasta salad that is found in grocery stores. I'm one of those people. It's cool, creamy, full of delicious flavors, loaded with healthy vegetables and a very not so healthy dressing that tastes so good.  This salad is exactly like that salad, only not from a boxed kit. It is much easier to make than you think, only requiring a few ingredients that you probably already have on hand.

This specific recipe came from CopyKat Recipes.  You can use any small pasta you like. Most go for shells since that is what the original uses. I chose ditalini this time since I already had some on hand.  Simply make sure that whatever pasta you choose has lots of places to hold the dressing.


Ingredients

2 c dry pasta
1 large carrot, peeled and grated
1 c frozen peas, thawed
1/2 c crisp bacon pieces, fresh or packaged
1 packet ranch dressing mix
1 c mayo
1/2 tsp onion powder

Directions

1. Boil pasta and carrots together until pasta reaches desired consistency.  Drain and rinse with cold water. Set aside to continue to drain.

2. In a small bowl, mix ranch dressing with mayo.

3. In a large bowl, combine peas, bacon, carrots and pasta.  Pour on ranch mix and stir to combine. Chill and serve.


I sometimes like to add leftover chicken to make this a more complete meal.  What are your favorite add ins?


Zucchini Fries with Sweet Onion Sauce

It's football season! That means camping on the couch, goofy rituals for good luck, and delicious finger foods for snacking.  Our team (Dallas Cowboys) hasn't done as well as we would like this year. They are 2-3 and two of the three losses were to teams who aren't known for being challenges. Maybe one day, our home team will start playing the way they did back when they were legends.

I came across this recipe on Pinterest one day and thought it looked like a great alternative to french fries for burgers. I was completely right.  This recipe is highly reminiscent of the famous Bloomin' Onion from Outback Steakhouse. The zucchini doesn't get as crispy as fries, but is much healthier, tastier, and prettier than its potato counterpart.   The recipe is from King Arthur Flour. I highly recommend the sweet onion dipping sauce. If you don't feel like getting that fancy, these fries taste great with your favorite salad dressing.

Tip: when I cut my zucchini,  I slice it in half, then stand the halves on end.  I then cut the half into 9 pieces (make 2 horizontal cuts and 2 vertical cuts). this gives the perfect size zucchini fry.

Ingredients

Fries
3 medium zucchini, unpeeled, cut into sticks
1 Tbsp salt
1 c coarse, dry bread crumbs (panko works best but regular will do just fine)
1/2 c grated Parmesan
1 Tbsp Italian seasoning
2 eggs, beaten

Dip 
1 Tbsp butter
1 medium sweet onion, sliced
2 Tbsp cider vinegar
2 Tbsp honey
1 Tbsp mustard
1 c mayo (not Miracle Whip)
Salt and pepper to taste

Directions

Dip
1. Melt butter over medium heat.  Stir in onions and cook until very soft and brown from caramelization. Remove from heat and stir in cider vinegar.

2.  Pour the onions into a food processor with honey, mustard, mayo, salt, and pepper. Blend until smooth. Refrigerate until ready to serve.

Fries
1. Place zucchini in colander and sprinkle with salt.  Allow to sit for 1 hour. Pat dry.

2. In a small bowl, combine bread crumbs, Parmesan, and Italian seasoning.

3. Prepare a baking sheet by laying down parchment paper and spraying with oil.

4. Dip zucchini sticks into egg mixture, then tossing in breadcrumbs to coat. Place on prepared pan.

5. Bake at 425 for 10-12 minutes, flip, then bake another 8-10 minutes until golden brown.

6. Serve warm with chilled sweet onion dip.

Tell me, who's your favorite football team? Are you proud of how they are doing this year? Leave your answer in the comments!


Friday, October 4, 2013

Mexican Pizza

Have you ever moved away from your home area and found that some of your favorite foods are not available at your new grocers? That happened to me when my husband joined the Army. We moved from Texas, where all my favorite foods are plentiful, to Kansas, where you can't find a catfish restaurant or a Mom and Pop BBQ joint (assuming you aren't in Kansas City) to satisfy your cravings.  That means I have to get creative. One of our favorite lazy meals is the Mexican Pizza by Red Baron. I have only ever found it at home and most of the grocers in my hometown carry it or a competitor's version.  I have been craving a hot slice of that tasty pizza lately and decided to come up with my own version.  After 1 bite, I may never buy another frozen pizza again!

For this pizza, I made my own crust (recipe here).  It was incredibly easy and far tastier than anything store bough or delivered.  The crust is a basic pizza dough and can be used for any pizza or calzone.  What are your favorite toppings?


Ingredients

1 pizza dough (recipe) 1/2 can refried beans
1/4 c salsa
1 1/2 c cheddar cheese, divided
3/4 lb hamburger
1 Tbsp cumin
1 Tbsp chili powder
1 Tbsp oregano
1/8 tsp cayenne
1/4 onion, diced
2 roma tomatoes, diced
1 small can black olives, sliced
1 handful tortilla chips, lightly crushed
sour cream and guacamole for garnish

Directions

1. Brown hamburger with onion, cumin, oregano, cayenne, and chili powder.

2. Prepare pizza dough on a pan.

3. Mix refried beans with salsa. Spread over prepared dough.

4. Sprinkle on 1 c cheddar cheese.

5. Top with hamburger, tomatoes, olives, and chips. Sprinkle 1/2 c cheddar cheese on top.

6. Bake at 500 for 8-10 minutes or until outer edges turn a golden brown.

7. Garnish with favorite taco condiments and enjoy.

I'm curious to know: Of the recipes that I have posted so far, what has been your favorite? Post your answer in the comments!

Basic Pizza Dough

Apologies in advance, there are no photos for this post.  However, I'm sure your imagination is excellent in thinking up a ball of dough. This dough is another (again!) Pioneer Woman recipe.  It is thin, crispy, and yet fluffy and chewy.  It may be the perfect pizza crust. It is for us, anyway. This dough can be used for pizzas, calzones, and whatever else your stomach desires. I'm sure you could make some amazing breadsticks with it as well.

The recipe makes for 2 pizzas worth of dough. The unused half can be stored in the fridge for up to 3 days. The dough can also be stored unbaked for up to 6 months in the freezer.

Tip: When measuring flour, use a spoon to scoop flour into the measuring cup instead of using the cup as a scoop. Using the cup causes the flour to pack and creates a denser bread when cooked.  Spooning the flour in ensures that the dough will be light and fluffy. Use this technique any time you need flour and you will see an improvement in your baked goods.

Ingredients

1 tsp or 1/2 packet active dry yeast
4 c flour
1 tsp kosher salt
1/3 c olive oil, plus extra for coating

Directions

1. Pour  1 1/2 c warm water into a bowl. Add in yeast but don't stir.

2. Combine flour and salt in a mixing bowl. Drizzle in the olive oil while mixing until just incorporated.

3. Stir the yeast/water mix. Add to flour and mix by hand until the dough forms a ball. Make sure that any chunks are broken up and mixed in well until a smooth dough is formed.

4. Coat a clean, large bowl with olive oil. Toss the ball of dough in and turn to coat with oil.  Cover with a moist towel and leave for 1-2 hours. Or, wrap with plastic wrap and refrigerate for up to 2 days.

5. To use, preheat oven to 500. That is not a typo, promise.

6. Divide the dough in half. Spread some oil on a baking pan. Use your hands to press and stretch the dough into the desired shape.

7. Add favorite toppings and bake for 8-10 minutes or until the edges are a golden brown.

Tuesday, October 1, 2013

Italian Roast Chicken and Vegetables


I made this! As in, this is my recipe! So what if I combined a few different recipes I have seen floating around Pinterest, the end result is mine! It is simple, full of flavor, a perfect one dish meal.

You can use any vegetables your heart desires. Try squash, broccoli, sweet potatoes, or peas.


Ingredients

6 chicken legs (or whatever piece of chicken you prefer, bone in or boneless)
1 packet dry Italian seasoning mix
1/4 c olive oil
1/3 c pesto
2 pounds total desired vegetables

Directions

1. Preheat oven to 350.

2. In a small bowl, combine oil, pesto, and dressing mix.

3. Place chicken and vegetables in a large roasting dish. Pour pesto mix all over, spreading out as best you can.

4. Cover with foil and bake for 1 hour, until chicken and potatoes and cooked through.

Friday, September 27, 2013

Gooey Turtle Cake

This cake is just as sinful as the picture shows. It is so rich and moist and amazing that a small piece will do ya. I couldn't help but pick at is as I prepared the icing and tried not to eat all the pecans before they made it onto the cake.  I love pecans. I can crack all day in the hopes of finding that one with the perfect flavor and consistency. And it is so satisfying to crack one and pull out two perfect halves. That doesn't happen often, usually I am digging pieces of shell out of pieces of pecan and drop most of the good stuff on the floor.

Anyways, back to the cake.  Don't bake this if you are on a diet. Don't bake this if you aren't planning to go into a diabetic coma after dessert. Do bake this if you want to know what heaven tastes like.

Ingredients

Cake
1 box devil's food cake with eggs, oil, and water called for on box
1 14 oz bag caramels
1/2 c evaporated milk
1 c chopped pecans
1 c semisweet chocolate chips

Icing
1 c semisweet chocolate chips
1 1.4 c heavy cream
1 Tbsp light corn syrup
Caramel for drizzling (I used ice cream topping)
Pecans


Directions


Cake
1. Heat oven to 350 (325 for dark or nonstick pans). Grease a 13 x 9 pan.

2. Make the cake batter as directed on the box. Pour half into the pan and refrigerate the unused portion. Bake for 20 minutes.

3. In a small saucepan, melt the caramels and evaporated milk. Pour over warm cake. Sprinkle on pecans and chocolate chips.

4. Spread remaining batter on top. Bake for 25-30 minutes, until a toothpick inserted comes out clean of cake.

5. Allow to completely cool. Run a knife around the edges and turn onto a baking sheet to ice.

Icing
1. Place chocolate chips in a medium bowl.

2. Bring cream and syrup to a simmer on medium heat. Pour over chocolate and allow to sit for 1 minute.

3. Stir until smooth and shiny. Pour over cooled cake and spread to cover.

4. Drizzle on caramel sauce and top with pecans.


Slow Cooker Shrimp and Sausage Gumbo

I love gumbo. Especially when it has sausage AND shrimp in it. It is filling, cheap, and so tasty. I know it is a Cajun dish by nature, but it is so prevalent in Texas cooking that it always reminds me of my home state.  We had friends over for dinner tonight and one (a native Texan) had never had this wonderful dish before! By the end of the meal, he was grilling me on the techniques and ingredients used.

I was hesitant about this recipe before I made it.  It didn't call for okra (whoever heard of gumbo without okra?!), had an odd way of making roux that I had never tried, and has minimal spices.  I was completely wrong to judge! The flavors were perfect and blended together so well.  This is a crock pot recipe but only takes 4.5-5 hours on low since the sausage is precooked and the shrimp takes very little time to be done. The majority of the time is spent softening in the okra and letting the flavors meld together.

Ingredients

1 can fire roasted diced tomatoes with juice
1 1/4 c chicken broth
1/4 c flour
2 Tbsp olive oil
3/4 lb smoked sausage (I used andouille), cut into small pieces
1 lb shrimp, raw (peeled and deveined)
1/2 onion, diced
1 green pepper, diced
2 tsp oregano
2 tsp thyme
1/8 tsp cayenne, to taste
hot cooked rice

Directions

1. Combine tomatoes and broth in slow cooker.

2. Heat flour in a dry skillet on high until flour begins to brown.  Stir to completely brown and slowly add in oil while whisking.  Add enough oil to create a smooth , thick roux. Stir into tomato mixture in crock pot.

3. Add sausage, onion, pepper, and spices. Stir and cook on low for 3.5 hours.

4. Add shrimp and cook 1 hour.

5. Serve over rice.


Do you agree with me? Is okra a necessity for good gumbo? Or do you find the vegetable to be too slimy for your liking?

Thursday, September 26, 2013

Baked Cheeseburger Macaroni

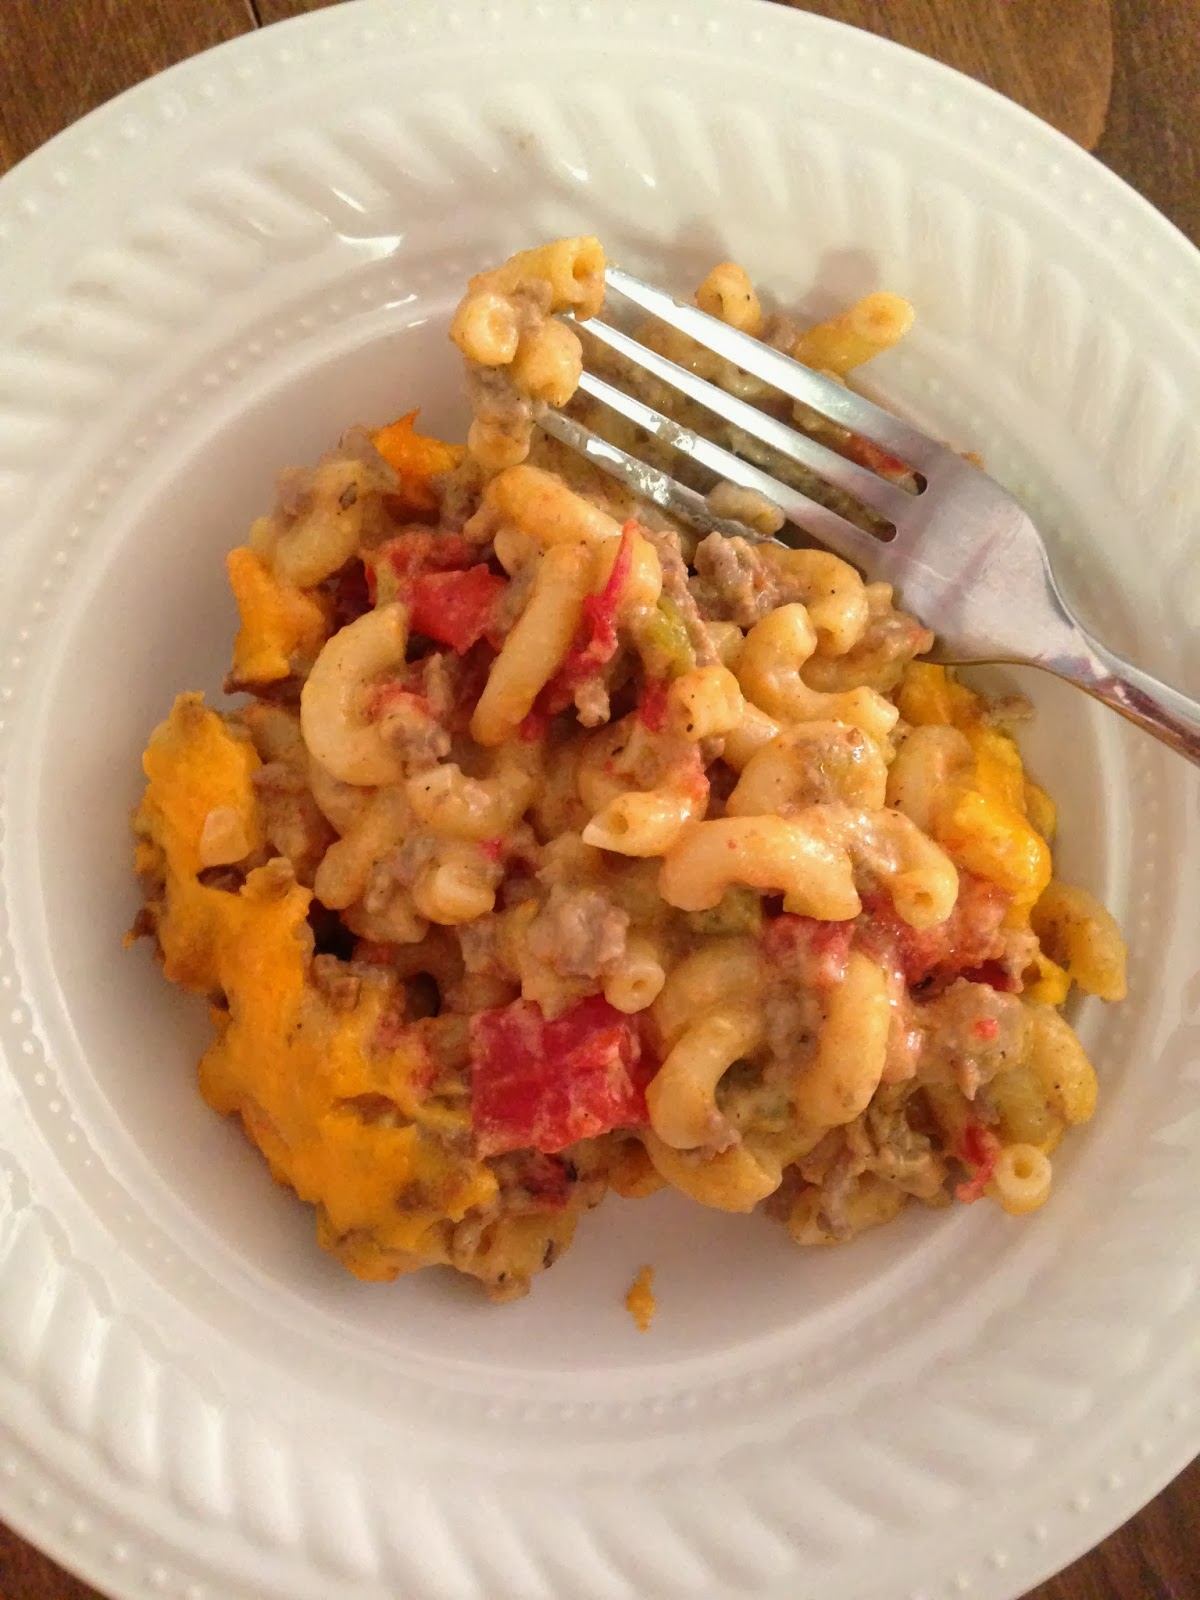
I love Hamburger Helper. I know, I know, it is full of unhealthy chemicals and unrecognizable ingredients. I don't care, I still think it tastes yummy. This Baked Cheeseburger Macaroni blows boxed Hamburger Helper out of the water. No, you can't have it on the table in 30 minutes, unfortunately. However, you can serve up a delicious meal that you know exactly what is in it and can customize to your family's taste.

The inspiration for this meal came from the Pioneer Woman, like many of my other recipes it seems.  I broke down and finally purchased her cookbook titled The Pioneer Woman Cooks; Recipes from an Accidental Country Girl.  On page 96, there is a delicious recipe for macaroni and cheese. It is a bit time consuming (around an hour) and is worth every minute of impatiently waiting by the oven.  I took her basic recipe and added in my own fixings to create this meal.  My darling little boy cleaned his plate and I have had the leftovers for lunch and dinner again.  Beware: this recipe makes A TON. The book says it serves 8. 8 extremely hungry people. If you don't want to be eating macaroni for the next week, cut the ingredients in half.

What special ingredients do you like to see in your cheeseburger macaroni?

Ingredients

1 lb hamburger, browned
4 c dry macaroni (16 oz box)
1 egg
1/4 c butter
1/4 c flour
2 1/2 c milk
2 tsp dry mustard, heaping
1 lb shredded cheddar cheese
1/2 tsp salt
1/2 tsp seasoned salt
1 tsp black pepper
1 c fire roasted diced tomatoes, drained
1 c diced green chiles, drained

Directions

1. Cook the macaroni until firm. It should not be soft enough to eat straight from the pot.

2. Beat the egg in a small bowl.

3. Preheat the oven to 350 and butter a large baking dish.

4. Melt the butter over medium-low heat and add in the flour. Whisk together for 5 minutes.

5. Add in the milk slowly, whisking constantly, to make the sauce. Stir in the mustard.

6. Temper the egg by slowly pouring in 1/4c of the sauce while whisking constantly to keep the egg from cooking. This warms the eggs up and keeps them from scrambling when added to the mix.

7. Whisk the egg mixture into the sauce. Add all except 1/2 c of the cheese, salt, and pepper. Stir until the cheese is melted. Adjust the seasonings if needed.

8. Mix in the macaroni, hamburger, tomatoes, and chiles. Pour into greased baking dish.

9. Top with remaining cheese and bake for 20-25 minutes, until the cheese is bubbly and golden.


Tuesday, September 17, 2013

Tomato Soup

Don't ever buy another can of condensed tomato soup again. This recipe is quick, delicious, and extremely easy.  Husband said it is the best tomato soup he has ever had.  I don't care for canned tomato soups and I had 2 bowls of this for dinner tonight.

I credit the Pioneer Woman with this concoction. This recipe is found in her cookbook titled The Pioneer Woman Cooks.  She adds in 1 cup of sherry at the same time as the heavy cream. Husband is currently on some heavy duty pain pills so we opted out of this add-on tonight. Also, the recipe calls for 3-6 T of sugar.  The sugar is to balance out the acidity of the tomatoes, so start with 3 T and adjust as you see fit.

A batch of this wonderful soup and a grilled cheese sandwich make the perfect combination on a cool rainy evening.

What are your favorite toppings for tomato soup?

Ingredients

1 medium onion diced, white or yellow
6 T butter
2 14.5 oz canned diced tomatoes (preferably fire roasted)
1 46 oz bottle/can tomato juice
3-6 T sugar
1-2 T chicken base or 3 chicken bouillon cubes
Black pepper to taste
1 1/2 c heavy cream
1/4 chopped parsley
1/4 chopped basil

Directions

1. Melt the butter in a large pot. Add in the onion and cook until translucent.

2. Throw in the diced tomatoes, tomato juice, and sugar. Taste and adjust sugar.

3. Add chicken base and pepper. Bring to a low boil and turn off the heat.

4. Stir in the heavy cream, sherry if desired, basil, parsley, and more pepper to taste. Serve warm.


Monday, September 16, 2013

Chicken Lasagna

A couple of years ago, Husband invited several guys from his company over for dinner. I threw together a simple chicken lasagna for them and it was a huge success. I haven't made it since until tonight.  I know that this isn't the exact same as last time, but it was still pretty darn good.

 Feel free to take any liberties you want with it and don't use all of the ingredients if you won't want.  I have put in the ingredients 1 jar of alfredo sauce. I didn't use quite the whole jar. You may use 2- adjust to your family's taste.  This lasagna would also do well with broccoli, sugar snap peas, and green beans as vegetable substitutes. Don't go too crazy though, keep it simple.


Ingredients

1/2 box lasagna pasta
4 chicken thighs, cooked and shredded (or equivalent of leftover chicken)
1 squash, quartered and sliced
1 bunch asparagus, chopped
1/2 bag mozzarella cheese
1 cup Parmesan
1 jar alfredo sauce


Directions

1. Cook lasagna noodles according to package directions.

2. While lasagna cooks, heat 2 Tbsp oil in a skillet over medium heat.  Saute squash and asparagus until tender. Season with salt and pepper.

3. Grease an 8" x 11" casserole dish.  Spread a thin layer of alfredo sauce on the bottom.  Layer the lasagna in the following order: pasta, sauce, chicken and vegetables, lasagna, sauce, half of the mozzarella and parmesan, lasagna, sauce, chicken and vegetables, remaining cheese.

4. Grease a sheet of foil and cover lasagna. Bake at 350 for 30 minutes. Remove the foil and bake another 15-20 minutes, until cheese begins to brown.

Thursday, September 12, 2013

Liz's Ranch Pork Chops

These wonderful pork chops are my sister's creation. She combined several recipes she has seen roaming around Pinterest and created an amazing cold weather dish. The gravy is perfect on mashed potatoes and the pork was excellently  seasoned and tender.

There are no specific spices that you have to use for this recipe. Open up the cabinet and throw in whatever floats your boat.  I used Kenny's All Purpose Seasoning.  It is a mix of sugar, salt, pepper, lemon pepper, paprika, and garlic. If you are lucky enough to live in one of the places that sells this spice mix, grab it up! The owner is from my husband's hometown and we try to buy local as often as we can.  Plain salt and pepper would also work if you aren't too wild about adding other spices.

Ingredients

4 bone-in pork chops (the bone falls off when you remove the finished product)
1 can cream of chicken soup
1 can cream of mushroom soup with roasted garlic
1 cup ranch dressing
4 Tbsp spices

Directions

1. Rub 1 Tbsp of spice on each pork chop front and back and place chops in crockpot.

2. Combine cream of  chicken soup, cream of mushroom soup, and ranch dressing and pour over pork chops.

3. Set crockpot on High and cook for 4-6 hours.


Saturday, September 7, 2013

Old-Fashioned Pancakes


Finally! A meal worth sharing! These past few weeks have been torture.  Any meals I have made have been mediocre and I didn't feel that it would be right for me to share them with the world until I have had a chance to tweak them. 

That being said, I LOVE THESE PANCAKES. I make them almost every weekend. They are made from scratch (no bisquick), are light, fluffy, and completely customizable.  I like them plain, sometimes with some food coloring to make them festive.  Husband and Son like bananas added or diced apples and a dash of cinnamon.  You can create to your heart's content.  Also, I always cook my pancakes on a griddle- each pancake comes out perfect, no sacrifices.  I have never used a pan and wouldn't know where to start.  I have heard that you start on a medium-low flame and don't use a lot of oil.  I read that you put in a very small amount and use a paper towel to wipe down the inside of the pan and soak up the excess.  There is a decent amount of oil in these already so you may not have to use oil in the pan. Maybe someone can give some tips in the comment section who has more knowledge than I do.

This recipe comes from one of Mom's cookbooks: Better Homes and Garden I believe. It is a huge, brown book with recipes for everything you could ever imagine.  People are always requesting this recipe if Mom makes them for a gathering. If you don't manage to eat the whole batch in one sitting (this makes a good amount of 1/4c pancakes), the leftovers freeze well and make a quick breakfast on weekday mornings.  They only need about 30 seconds in the microwave, flipped over, and another 30 seconds. Be careful though because they dry out quickly and become hard.

What are your favorite pancakes? Original? Blueberry? Something completely off the wall like chicken and olive?

Ingredients

2 c flour
1/3 c sugar
3 Tbsp baking powder
1 Tbsp salt
2 c milk
1/3 c oil
2 eggs

Directions

1. In a medium sized bowl, combine the flour, sugar, baking powder, and salt. Separately, whisk together the milk, oil, and eggs. Pour the wet ingredients into the flour mixture and whisk until all lumps are gone.

2. Heat a nonstick griddle to 350. Using a 1/4c measuring cup, laddle batter onto the pan in small batches. My griddle will hold 4 pancakes, sometimes 5. Allow the batter to cook until it begins to bubble. Once the bubbles start popping and there are open "pores" all over the pancake, flip over. The pancake should have a golden brown color. After another minute, flip over again to check that the bottom is cooked. Remove and serve with butter and syrup.


A few tips:
  Do not press down on the pancake while it cooks! This will not make it cook any faster and will cause it to lose fluffiness. Same with grilling hamburgers- you lose all the yumminess and come out with a dry, nasty disk.
  If your skillet temperature is too high, the pancakes will be tough and chewy. Too low of a temp and they will be dry.
  Don't add to many extras into the batter or it will fall apart while cooking.


Monday, August 26, 2013

Fried Chicken with Garlic Honey Sauce

It never fails, my pictures look great when I snap them but always seem to be blurry when I post them.  One day I will become a better photographer.

 Don't let the crumminess of the photo fool you though, this is a great dish. The breading has tons of flavor and the sauce is perfectly sweet.  My little vegetarian ate all of his chicken at dinner tonight and barely touched his vegetables.  Normally, things are the other way around.

I originally pinned this recipe from ilovetocook.org.  A few tips to keep in mind when you are frying: allow the breaded chicken to sit for a minute before putting it in the oil so the breading has time to "glue" itself to the meat.  Also, don't turn the chicken until you are absolutely ready.  Turn it only once to prevent the breading from falling off.  Lastly, make sure that the oil is sufficiently hot.  Drip some water into it and if it sizzles, it is ready but you don't want the oil to be smoking- that is too hot and will burn the breading long before the meat is cooked.  Also, if you feel that your chicken still isn't finished cooking but the breading is starting to burn, finish off the chicken in the oven.


Ingredients
4 breasts or thighs, pounded thin
2 c flour
3 Tbsp ground ginger
2 tsp thyme
2 tsp sage
2 Tbs paprika
1 tsp cayenne (to taste)
Salt and pepper to taste
2 eggs
1/2 c milk
2 Tbsp olive oil
4 minced garlic cloves
1 c honey
1/4 c soy sauce

Directions
1. Make an egg wash by scrambling the eggs and milk.  Seperately, combine the flour, ginger, thyme, sage, paprika, cayenne, salt, and pepper.

2. Coat the chicken with the flour mixture. Dip into the egg wash, then recoat with the flour.  Set the chicken aside.

3. Heat a skillet over medium heat with 1/4-1/2 inch oil in the bottom.  When the oil is sufficiently hot, fry the chicken.  Only flip once!  Since the chicken has been pounded thin, the pieces shouldn't take more than 5 minutes per side to cook.

4. Drain chicken on a paper towel and set aside.

5. In a medium omelette pan, heat olive oil and garlic.  When the garlic is soft but not brown, add the honey and soy sauce.  Allow the sauce to simmer for 5-10 minutes. Do not step away- the sauce will bubble and potentially overflow from the pan.  When at the desired thickness, remove from heat and serve over chicken.

Tuesday, August 20, 2013

Grandma Schenk's Chicken Chicken Breast

My husband's grandmother was an extraordinary cook.  I was never lucky enough to eat her meals but I hear they were amazing.  They were always the first dishes to disappear at family reunions and the hardest to recreate.  Her meals were simple, made with readily found ingredients that she often grew herself.

Before Grandma passed away, her daughter's (in-law) had the good sense to pick her brain for her recipes. They presented each family with a cookbook that year at the family reunion. Some of the recipes are straightforward and some you can take liberties with.

This recipe is calls for using your imagination.  The book's instructions are to flour and fry your chicken, pour the gravy on top and bake for an hour.  The gravy ingredients are listed but not the flour mixture to fry with. I don't know what spices Grandma used (if any) or if she had any special techniques or secrets.  I have included what I used to bread the chicken. If you have a breading that you prefer, feel free to use that.  My husband said that he doesn't remember eating this at Grandma's but that my version is delicious.

Ingredients
4 chicken breasts or thighs, pounded thin
2 c flour
2 tsp ginger
2 tsp thyme
2 tsp sage
2 Tbsp paprika
1/2 tsp cayenne
salt and pepper to taste
4 eggs
1/2 c milk
2 cans cream of chicken soup
1/2 c beer
1 Tbsp soy sauce
1 can mushrooms

Directions
1. In a small bowl, combine the flour, ginger, thyme, sage, paprika, cayenne, salt, and pepper.  In a separate bowl, scramble the eggs and milk. 
2. Dip the chicken into the flour mixture, then the egg mixture, then back into the flour, making sure it is evenly coated each time. Set aside to allow the breading time to stick to the chicken.
3. Heat 1/2 inch oil in a skillet over medium heat.
4. Place the chicken in the oil and brown, about 4-5 minutes each side.  Don't worry about cooking all the way through. Drain and place in a baking dish.
5. In a bowl, mix the cream of chicken soups, soy sauce, and beer.  Pour over chicken.  Top with mushrooms.
6. Bake uncovered at 350 for 60 minutes.

Monday, August 12, 2013

Tex-Mex Squash Casserole

Squash casserole.  There aren't too many things more summer than fresh squash from the garden (grocery store), baked to perfection with tomatoes and cheese (and jalapenos in this case). If you have ever eaten at my home, you have most likely been served this wonderful dish.  It is a favorite of my family and I could eat it every day.  Every. Day.

This particular recipe comes from a cookbook titled The Homesick Texan.  I adore this cookbook! I have made a fair portion of the recipes located in its pages and have never once been disappointed.  The author grew up not too far from where I did and has included some amazing photos of my home state.  She lives now in a small apartment in New York City and has learned to make some of my favorite recipes like fajitas al carbon and brisket in a non-traditional way that still taste like home.

Anyways, I love this recipe.  You can use all squash, all zucchini, or any mixture of the two you wish.  It can get spicy quickly with 2 jalapenos and cayenne so adjust as needed. I only use 1 pepper since my toddler son hasn't developed a heat tolerance yet.  Also, I became distracted watching How I Met Your Mother while cooking so I forgot to take photos of the process. I apologize but the directions are straight forward and easy to follow. Let's get cooking!


Ingredients

2 Tbsp butter
2 pounds squash/zucchini
1 medium onion
2 jalapeno chiles, seeds and stems removed
2 cloves garlic, minced
1 tsp cumin
1 tsp chili powder
1/2 tsp cayenne
salt and pepper to taste
2 Tbsp flour
1 c chicken broth
1 can fire roasted tomatoes (you can use regular but I think the fire roasted have better flavor)
1/2 c half-and-half
1/2 c sour cream
2 c crushed tortilla chips
2 c cheddar


Directions

1. Heat the butter in a LARGE pot on medium heat.  Add the squash, onions, and jalapenos, and saute until the vegetables are soft, around 10 minutes.

2. Add the garlic, cumin, chili powder, cayenne, salt, and pepper. Simmer for a minute.

3. Stir in the flour and cook until a light brown paste forms.  Add the broth and tomatoes and simmer for a few minutes until the broth thickens.  Remove from heat and add the half-and-half and sour cream.

4. Layer the bottom of a large greased casserole dish with the chips and pour the squash mixture on top. Cover with cheese and bake uncovered at 350 degrees for 30 minutes or until the cheese is brown and bubbling.

Sunday, August 11, 2013

Bacon Crockpot Chicken

I love lazy Sundays.  Get the house work done on Saturday, or Friday night, and the rest of the weekend is spent lounging on the couch watching movies and moving as little as possible.

In an effort to make Sundays even lazier, I use my crockpot as often as I can.  I have even found a way to not have to wash it: crockpot liners by Reynolds.  They are handy things to have; they don't alter the flavor of the food, don't burn or melt, and rarely do they get a hole.  I think the holes usually come from me stirring too hard.

Tonight's dinner was perfect for a Sunday night.  The only effort I put into it was what little prep there was for the chicken and making the sides.  The meal was hearty, filling, and tasted fantastic!  My picky little eater at everything and asked for more. I generally cook for an army but tonight I only made three thighs (I don't care for breasts) so I could conserve my chicken for later meals.  That was a mistake. There are now no leftovers for lunch tomorrow.

The original recipe can be found at Moms with Crockpots


Ingredients:

8 bacon slices
8 boneless, skinless breasts or thighs
2 cans roasted garlic cream of mushroom soup
1 c sour cream
1/2 c flour
salt and pepper to taste


Directions

1. Wrap the 1 slice of bacon around 1 piece of chicken and place in the crockpot.

2. Combine the soup, sour cream, and flour and whisk until well blended.  Pour over the chicken.

3. Cover and cook on low for 6-8 hours.  Remove the chicken and stir the gravy again to make sure it is blended. My chicken fell apart as I pulled it out so small chunks were left in the gravy.

4. Serve gravy over chicken and enjoy. Learn from my mistake and make the full recipe, not half!


Saturday, August 10, 2013

Simple Sesame Noodles


This recipe comes from the amazingly talented Pioneer Woman.  I often fix these noodles for lunch but they can easily be made into dinner by adding scrambled eggs and leftover meats and veggies. They are simple to create yet the flavors are complex and blend perfectly together.  

I made these today using chow mein noodles.  Any type of Chinese or Italian will do however; save a buck and use what you have on hand. The other ingredients can be found in the oriental section of most grocery stores.


Ingredients

12 oz thin noodles, cooked and drained
1/4 c soy sauce
2 Tbsp sugar
4 cloves garlic, minced
2 Tbsp rice vinegar
3 Tbsp sesame oil
1/2 tsp hot chili oil
4 Tbsp canola oil
2 Tbsp hot water (use the water from the noodles as they cook)
4 green onions, sliced


Directions

1. Whisk all the ingredients except the noodles and onions together. Taste and adjust as needed.

2. Warm sauce in a small saucepan.  Add the cooked noodles and toss to coat.

3. Sprinkle on green onions and serve.

Wednesday, August 7, 2013

Slow Cooker Carnitas


I have been cooking up a storm the past few days trying to find the perfect recipe to start off this project.  The dinners of the past couple of nights have been less than satisfactory.  Tonight's dinner, however, was fantastic.  I pinned this recipe on Pinterest some time back and am glad I waited until now to make it.  The pork was perfectly tender and full of amazing flavor.  Husband and I found ourselves picking at the meat while I finished preparing the sides.
    
  You always hear the phrase that low and slow is best for meats.  I have found that is true for the oven but not necessarily for a slow cooker.  I believe that the opposite is best for tough meats like pork or beef: cook on high for 4-5 hours.  I am always rewarded with a tender, juicy entree and this pork was no exception.   

This recipe can be found at allrecipes.com.  It is very simple and straight forward. Beware, it makes a lot of meat.  Husband and I had two burritos each and had enough meat left over for at least 2 more meals.  Throw on some fresh pico de gallo and guacamole and you have a very filling meal.


Ingredients:

1 tsp salt
1 tsp garlic powder
1 tsp ground cumin
1/2 tsp crumbled dried oregano
1/2 tsp ground coriander
1/4 tsp ground cinnamon
1 (4 lb) boneless pork shoulder roast
2 bay leaves
2 c chicken broth


Directions:

1.  Mix spices together (except bay leaves) and rub over the entire roast. 

2. Place the bay leaves on the bottom of the crock pot and set the roast on top.

3. Pour the chicken broth around the roast being careful not to wash the seasonings off.

4. Set the crockpot to High and cook for 4-6 hours.

5. Remove the roast from the slow cooker.  Mine fell apart as I pulled it out- always a good sign.

6. Shred the meat, place into flour tortillas, add whatever toppings you wish, and eat up!


This recipe is a keeper for our house.  The spices smell amazing as you rub them in to the meat and even better during the cooking process.  I had to contain myself from eating the whole roast by myself.  The recipe at the link above claims that this also makes a great pulled pork sandwich by adding your favorite BBQ sauce after cooking and piling high on a bun. Yum!